
Organizing your Craft Supplies after the Holidays
The holidays are over, and it’s time to organize your craft supplies!
It’s the time of year when we’re all taking down our holiday decorations and putting away our holiday craft supplies. If you’re like most people, your craft room is probably in a bit of disarray after a busy season of holiday crafting. But don’t worry -organizing your craft supplies and getting ready for the new year is easy!
Here are a few tips to organize your craft supplies after the holiday season

Get rid of anything you don’t need or use.
As crafters, we love to keep everything! Every last scrap of paper, just in case. However, if you want to have a more organized and clutter-free workspace, you also need to make room for new craft supplies. The first step toward organizing your craft space is to get rid of anything you don’t need or use.
I know, it’s a tough thing to say to a crafter! However, if you have any leftover craft supplies from last year that you know you’re not going to use, get rid of them! Donate them to a local organization or sell them at a garage sale (see tip number 5). This brings us to tip number two.
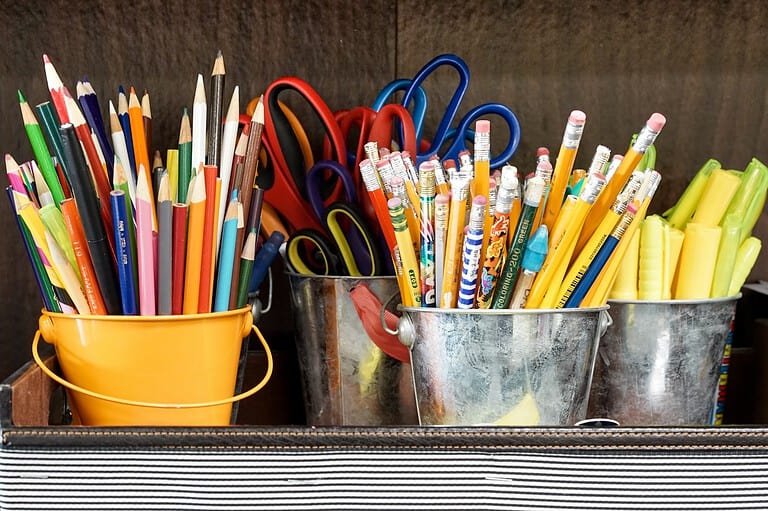
Sort everything into categories
Once you’ve gotten rid of anything you don’t need, it’s time to sort everything into categories. First, it’s import to sort your craft supplies. Why sort them? It is simpler to organize when you have similar items together.

I recommend sorting by type first, such as all your paints together, all your papers together, etc. Then, within that big group, sort your items into subcategories.
For example, let’s go with paint. I have many different types of paint that I use for different crafts. My acrylic paints are all arranged in a rainbow pattern (think R O Y G B I V). After you’ve gotten through the sorting phase, we move on to tip number three.
Label Everything
Labeling is probably my favorite thing about organizing craft supplies (second to collecting stationery supplies). I like to make the labels pretty and colorful, and I get to use my Brother P Touch Labele Maker as well as my Cricut Maker and Brother Scan – n – Cut machines.
Labeling everything will help you stay organized and make it easier to find what you need when you’re ready to start crafting. Label each category, and then label each individual item within each category.
For example, I have an IKEA Alex unit, one with longer drawers and wheels. I did not put wheels on mine because I did not want my unit to move around.
I purchased small legs, also at IKEA, and my Cricut Maker sits on top. I have sticky notes on the drawers listing everything inside for when I make the permanent labels.

When I’m comfortable with the category names for each drawer, I use various colors of removable vinyl to cut out all my labels at once.
I did the same for the tall Alex drawer unit I have that houses all my embellishments and other odds and ends that did not find a space within my Kallax units. Speaking of storage, let’s check out tip number four.
Invest in craft supply storage
This will be a long section. Investing in a storage system is a great way to keep your supplies organized and tidy. Storage containers come in all shapes and sizes, so you can find storage ideas that will fit your storage space, big or small.
I have been building my storage system using the IKEA Kallax units. I have a couple of units that are 3×4 (3 cubes by 4 cubes), and I have a 1×4 unit. As mentioned before, I also have 2 different Alex drawer units and some other matching cube systems from Target, Home Depot, and Big Lots.

When thinking about storage, use what you have on hand! I started with just a few bins and baskets from Target, Walmart, and Dollar Tree. Yes, Dollar Tree has some affordable storage options.
But you do not need to start off by spending a lot of money to get organized. If you have an unused dresser or another piece of furniture, put it to use!
The bins and baskets I have inside my Kallax units are mix-and-match; I have clear bins (the Home Edit type ones I found at Walmart as well as the Container Store). I found the cube bins at Target; I also utilize totes that house a lot of my deco mesh and ribbons, as well as having a few specifically for holiday craft supplies.
I usually go through my supplies twice a year, after the holidays and just before summer. I purge what I’m not using. By “purging,” I really mean I donate a lot of unused items.
I also make use of every bit of space in my room. I’m fortunate enough to now have a bigger space. However, I spent many years in a very small space.

I make use of a lazy Susan in some of my cube storage, especially when organizing my craft paint, Tim Holtz sprays, and paints. I also have a couple of pegboards. I use a pegboard in an area I designated for my Cricut and Scan-n-Cut machines.
I have researched and worked out a system for storing paper that works for me. For my 8.5 x 11 size paper, I use clear plastic sleeves, the kind you put in a ring binder.

I have adopted the rainbow way of sorting my paper; thank you, The Home Edit! I also have a rack where I store my 12×12 Designer Series papers that I’m currently working with or that are new in my Stampin’ Up! catalog.
I make tabs with a We R Memory Keepers tab punch and label my paper with color names and manufacturers like Stampin’ Up!, Polished Pink, and Recollections Purple.

I have a craft cart that stays next to me under my desk with all the little supplies I use every time I’m making a card, such as embellishments, foam squares, adhesives, and stamping blocks, to name a few.
I know some crafters keep cars just for planning and storing planning supplies. The cart houses a lot of my small items as well as marker storage for their Copic markers or other alcohol markers.
This is a Michaels Recollection cart, It works great as well as has extra hooks to maximize your cart space.
Organize your Craft Supplies after the holidays, Continued!
Conclusion
In most aspects of my craft room, I like to use clear plastic storage for things that I use more often, so I can see them. I’m more of an “out of sight, out of mind” person. But that always bites me in the butt later as I forget what I have.
Nonetheless, all the storage systems are great, and if you are in a position to be able to invest in a system that works, that is great for you, and have fun! I had so much fun when we moved to a bigger house and I was able to set up my craft room how I wanted and have the space to do it. I also have systems in place in my closet, as I was fortunate to have a walk-in closet.
Whether you have an entire basement, or just a little space in the corner of your room—even the dining room table—there are systems available to fit any space. Simple storage solutions can be found at the dollar store, or even in your own home. I could expand this section into an entire blog post (and I think I will expand more on this in another post coming soon).